Asking My Bridesmaids!

16 04 2012

From the moment I got engaged, I knew exactly who my bridesmaids were going to be (afterall, Nick and I have been together for over 8 years, so I’ve been planning this wedding in my head for about 7 years!). They were the first four girls I called once I had the ring on my finger.

When I called my sister to tell her the news, she said:

I’m your maid-of-honor, right???

Of course she was! She’s my only sister and my best friend. I had planned to ask her, but she took the words out of my mouth. I also planned to ask my 2 best friends and sister-in-law to stand beside me on our special day.

Image

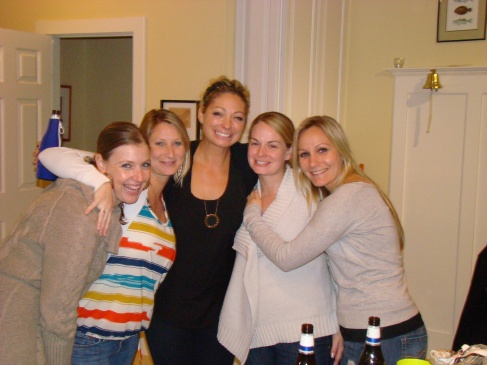
Me and my maids at Christmas time, this was taken 4 days before I got engaged! (from left to right, my sister in law, best friend A, sister, ME, best friend N).

I still wanted to come up with a fun way of asking my girls to be my bridesmaids. I’m sure you’ve all seen the movie Bridemaids, so I thought I would gift that movie to all of my girls with a special twist:

Image

I found the movies online from Amazon and purchased them for around $10 each. Then I found the movie cover online and brought it into Photoshop. Then, thanks to Facebook, I was able to find beautiful pictures of all my maids facing the way I needed them to. Since I only had 4 bridesmaids, I had to get rid of Melissa McCarthy on the cover, which I did using the clone stamp tool and then found a picture online with an arm to put on the hip of the girl on the far left since origianlly her arm was around Melissa McCarthy’s character. At the bottom of the movie cover, it already said SAVE THE DATE, so I Photoshopped the movie release date and replaced it with our wedding date: October 27, 2012 (194 days to go, thanks countdown app on my iPhone)!

All of my bridesmaid’s loved it! They already loved the movie and loved the personalized touch. It made for some good laughs when one of my maids glanced and the cover and said, “Oh, I love this movie!” and then did a double-take and gasped. I included the movies inside of a reusable gift bag (perfect size for your lunch – I found them at Michael’s for $1.50 each – I also used my teacher discount – you can get 15% off your entire purchase with your school ID) with a handmade card (supplies from A.C. Moore), tissues with their initial (Michael’s $1 bins), chocolates and the movie inside. I also made a little tag with their name and a fabric flower from some leftover craft supplies. The cost per bag was less than $15 (including the movie) and my bridesmaids got a kick out them!

Image

Here is the card I made for them using inspiration from our wedding colors (black, white green). I found a similar card online, but decided I could make my own and changed some of the text to be more fitting for me and my maids. The wording on the card says:

Will you be my BRIDESMAID?

Will you hold my hand on my wedding day?   Will you be my best friend, my sister, and my free counselor?  Will you help me pick out the perfect dress?  Will you dance the night away with me?  Will you stop me from registering for appliances you know I’ll never use and bite your tongue when I register for china you know I’ll never use?  Will you help me celebrate being single for the last time? Will you help me when I’m sad & overwhelmed and forgive me when I’m mad?  Will you please help make my special day as perfect as it can possibly be?  Will you be on your best behavior at my shower, smile endlessly for photos, and make sure no one gets too drunk?  Lastly, will you hold my dress when I have to pee?

The cards were easy to make and I’m happy to post a tutorial if you’re interested! Image

So, how did you/do you plan to ask your bridesmaids to stand by you on your wedding day?

***This post was created as part of my application to become a blogger for The Budget Savvy Bride***


Lyrics

24 12 2011

Now in my dreams, you’re with me.

Miles above, the flashing of neon,

the glory of siren lights.

And Adonal, you carry me away.

Though, it rains keep your faith.

I know I’ll seee you in heaven.

Copyright © Bryan Zimmerman 2006


Chevron Chair Redo

21 06 2011

I ordered fabric weeks ago to redo my dining room chairs. I love a gray and yellow color combo, so I decided on a yellow and white chevron pattern for my chairs in my gray dining room.

I ordered the fabric from Texas Susannie’s (aka The Best Little Fabric Store in Texas). They had the best price for this fabric that I could find  at $8.25/yard. Of course now – it’s on sale for $6.98/yard! I ordered 2 yards and it shipped pretty quickly. Then sat draped on one of my chairs until I decided I had some time to start the process of covering the chairs. Like a dummy, I took all the legs off the chairs thinking I had to, to get to the screws to take the cushion off. After I took them all off I realized the screws were accessible without the extra work. Now, this will make the other chairs go MUCH faster. Take out four screws, do my best to straighten the chevron pattern staple, remove, staple, remove, staple again until I’m happy. So I have one chair done, but I wanted to share the before and after. Let me know what you think!


Feeling Blue (Deep Royal to be exact)

8 11 2010

Living in Baltimore City in a rowhouse means all the houses look a little bit the same. I love my brick front (that was definitely what I wanted when picking a house) and since I moved in I was not loving my reddish front door. It blended in with the brick and just wasn’t fun. Walking around my neighborhood and seeing some of the other fun door colors made me want to grab a paint brush (and roller, gray primer, screwdriver, dropcloth, etc.)

So after talking about it for at least a year, I decided on painting my door blue, dark blue that would still look good with my black shutters. So we set out to Home Depot and selected Behr’s Deep Royal in Exterior Satin. When we started to paint, we realized we’re gonna need some primer. So a second trip to Home Depot later and we were back with Gripper Gray primer.  We started with two coats of that:

By the time we finished the two trips to Home Depot and two coats of primer, we had to head out for a family bowling event. We left the house with the door primed – it looked silly but might as well do it right!

This morning I got up and started painting with the blue, it’s going to take A LOT of coats of this paint. So…paint and paint I did. After 2 coats the door looked something like this:

Not the look I was going for…but making some progress on the color, but it took several more coats to get to the final product:

To be honest, I am actually “feeling blue” about the color – this is not the outcome I had in mind. The swatch we picked was darker (more toward the navy end, but still blue enough not to clash with the black shutters). Not only that  – but for the life of me, I couldn’t get even coverage. I don’t know if it was painting in the cold (though the paint said we could use it as long as the temp was above 35* – which it was) or the primer & paint in one or what the deal was. But close up it looks like it was done with a crappy brush and someone who didn’t really care – NOT TRUE! I painted this door for 8 hours!

Not happy at all. I suppose more trips to Home Depot are in store for me to find the right blue and fix this mess. And yes, my brick needs to be cleaned – already borrowed the power washer from the boyfriend’s parents. His dad even sent some special detergent packet so I probably get my marble steps to gleam and my brick to look great again. It’s so lame how excited I am to powerwash my house. I just love-love-love projects where the before and after is soooo obvious. This before and after is obvious, but I’m not loving it as much as I thought I would. What do you think?


Backyard: Part II – Girl Gone Gray

17 05 2010

Back with part dos of the backyard update. We spent the weekend working outside on the “yard,” it was perfect weather for it too, breezy and warm – but not too warm! Our list included:

  1. powerwashing the vinyl siding
  2. painting the back door
  3. replacing back door hardware
  4. weeding
  5. sweeping
  6. cleaning up cement spots

While there is more to be added to that list, it still felt like a fairly productive weekend. I am really liking the new backdoor color. It’s Valspar’s Charcoal Smoke in outdoor satin. It’s got a hit of blue in it (either that or the gray blue on the back of my house makes it look more blue). I also added brushed nickel hardware to the door which helped with the modern and fresh look I was going for. The door makeover was $60 – $45 for the door hardware, $15 for the paint. Though kind of pricey, it made a huge difference! I have a ton of paint leftover, I only used maybe 1/6 of the quart. However, as Nick said it would be easy to overuse this paint, so I should just hide it away for touch ups – which are inevitable – as Penny “knocks” on the door when she wants to come in from sunbathing by scratching the door.

So, a little before and after for you:

And of course, the after:

I’m pleased with the results and feel this back door reflects my personality much more than the before.


Backyard: Part I – Garden Gone Green

16 05 2010

Living in the city means that I don’t have a beautiful green lawn or large outdoor space, I have a lovely concrete pad. I do my best to make my yard a nice oasis to relax in and try to make small inexpensive changes to spruce things up. When I first bought my house, I had a jungle (literally) growing in the garden bed. This was promptly cut down when they installed a drain pipe. I was happy to be rid of the jungle, but was left with a garden bed of clay-like soil and didn’t think I could grow much back there. I decided to try out my green thumb (which up until this point was limited to a planter box on my previous apartment’s balcony and working in my parent’s yard). The results were sub-par because I didn’t want to spend a lot of money, but I at least went from this:

To this (complete with a shot of Penny basking in the sun):

Since then, those plants have seen better days (Penny sometimes uses that area as a restroom when she’s outside and apparently her pee is nothing like plant food). The lights are great – for about $3 each from WalMart they are solar path lights that get pretty bright at night. (I know – the walls need a serious power washing – this is on the list). The tree in the corner is Nick’s Christmas tree from 2 years ago (when you live in an apartment, that size tree is more than enough).  I also inserted some lights in the base of that, however, in that corner they don’t get quite enough sunlight to light up much at night. As for that garden bed, while I enjoy not having all concrete back there – it takes up quite a bit of my usable space (3 1/2 by 9 1/4 feet) and is a little more than I need in one area (I have become a big fan of container gardening). So I am considering filling it in and adding a raised bed on the back wall OR once the fencing panel goes up, adding window boxes and hanging plants all around. Filling in the concrete gives me a larger space for a patio set since I currently have three levels in my yard (path to back gate, main patio, garden bed). I have been scouring Craiglist for a good patio set, so far I’ve found a few, but haven’t heard back or it’s already gone by the time I put in my offer. I know I will find one, just need to be vigilant about searching.

I will be adding another post about the backyard and some other changes we made.

Just to give you an idea of what the yard looked like when I was looking to buy (we couldn’t get out the back door so this is through the kitchen window):

The jungle isn’t growing quite yet, remember I went under contract in April and didn’t settle until August so it had 4 months of rain and hot summer sun to get growing. Sometimes when I see these pictures I am glad I could see some sort of potential with this house because most people would have just walked away!


Guest Room – on the cheap

25 02 2010

So, I have some friends coming into town this weekend. I wanted to be able to give them a nice comfortable room to stay in and not drop a ton of money. Almost everything in this room is re-purposed from another area of the house except the bedding, curtains, frames, and small rug in front of the door. Unfortunately I don’t have any “before any work at all” pictures, so these will have to do.

The dull before (with already painted walls, trim and ceiling, furniture & curtains):

The much better “guest room on the cheap” after:

Supplies list:

Bed – my old bed – free

Sheets – Microfiber Silver – Kohls – $17

Green pillowcases – BH&G – Walmart – $10

Black/White pillowcases – Made with Anna Griffin fabric purchased from Fabric.com (2 yards) – $14

White Comforter – Ikea – $30

Curtain – White panels – Walmart – $14

Tables – Lack from Ikea (already owned) – free

Rug in front of door – Ribcord – Kohls – $8

TV/dresser/file cabinet (already owned) – free

1/2 of 5 x 8 sheet of Luan to cover duct work and create shelves – painted with Behr SnowFall – $5

Decor:

Books from bookcase (already owned – remove cover and voila, a James Patterson book looks like a classic) – free

Clock (gift – already owned) – free

Birdcage/lantern – Michaels – $6

Green bird – Michaels – $2

Pictures – my own (Trees at sunset, USS Constellation Baltimore Inner Harbor, 4th of July Inner Harbor) – free

Frames – Michaels – $5 each!

Elephant candle (gift – already owned) – free

Basket (re-purposed from bathroom – already owned) – free

Towels x 4 – Sonoma – Kohls – $4.50 each (and they are soft!)

Wall color – Dutchboy Mt. Ranier (could use another coat – but I was pressed for time) – $14

Trim, ceiling, doors – Behr Snowfall – $20 (still have 1/2 can left), so $10

Grand Total: $163

I love-love-love the Anna Griffin fabric. I spent hours searching for it online after seeing a purse made out of it on Etsy. The post contained no info on who the fabric was designed by (of course, why would they give away their secret), so it took a lot of searching, but I finally tracked it down. Overall, I am pretty happy with the room since I only spent $163.


Cover-up

24 01 2010

So I bought my dining room set on Craigslist, I got a great deal.  The table and chairs are in great condition, a tiny tiny scratch on the table, but not noticable unless someone points it out to you.  The woman selling the set wanted $300, I offered her $200 and walked away with a nice table, leaf and 6 chairs.  Here is the table in all its glory:

When I bought the table I noticed that the white chair covers had seen better days.  I’ve recovered dining room chairs before so I figured I would do the same with this set.  I wanted to bring a little color in when I did it and since I love Amy Butler fabrics, but have never used them for a project I thought I might try them out.  You can’t buy fabrics directly from Amy Butler, so I headed out on a search for a few different fabrics from her Daisy Chain collection.  I found a great site that was really easy to use, and offered coordinating prints and colors.  That site is Hawthorne Threads, it’s a great site, IF you can find what you need.  They only had 2 of 3 fabrics I wanted in stock, and it was silly to pay twice for shipping from two different vendors so I searched for another site to get all 3 from and came across FabricWorm.  They had everything I wanted so I ordered from them instead of Hawthorne.  Here is what I ordered:

It should arrive this week and I will cover the chairs and post some before and after pics.  I hope it looks good.  Of course, once I cover them the orange rug in the dining room will have to go (it’s for the living room anyway – once we get ride of the carpet).  The rug is from Urban Outfitters and I am considering going with the same rug in the green to bring out the pops of green in this fabric, but haven’t decided yet.  Thoughts?